

How are structures created?
Automatically using pre-existing structure records and/or positional information
For established rail networks structure records already exist in an external database. When Cordel Connect is configured, these records are imported into the system. Each structure arrives with a location (expressed as a route/ELR, track, and distance range), a type, a subtype, and a unique identifier called a Track Structure ID (TSID). The TSID is the key that links survey data back to specific real-world infrastructure.
When a new survey is uploaded, the system attempts to automatically match the incoming slices to existing structures using the TSID embedded in the slice file, or by comparing the slice's track position against known structure locations. If the system can't find a match, the survey is flagged as "unmatched" and a user must assign it manually.
Manually by users
Users with the appropriate permission can also create structures directly in Cordel Connect. Once created, the structure exists in the system and slices can be assigned to it.
How to create a structure manually
Prerequisites
Access
-
You can log into Cordel Connect.
-
Your role includes permission to create Structures.
Required information
Collect as much of the following as possible before you start:
-
Structure name
-
Structure identifier (TSID)
-
Type (e.g. signal, structure gauge, bridge, portal, etc.)
-
Location:
-
ELR / route
-
Chainage or milepost (or equivalent)
-
GPS coordinates (lat/long) if used
-
If you're unsure which values to use, check your local configuration guide or ask your Cordel Connect admin.
1. Navigate to Structures
Sign in to Cordel Connect.
From the main menu, to go to Gauging> Structures.
2. Create a new Structure
On the Structures search page, use the '+' icon to create a new Structure.

The Create Structure form will open.
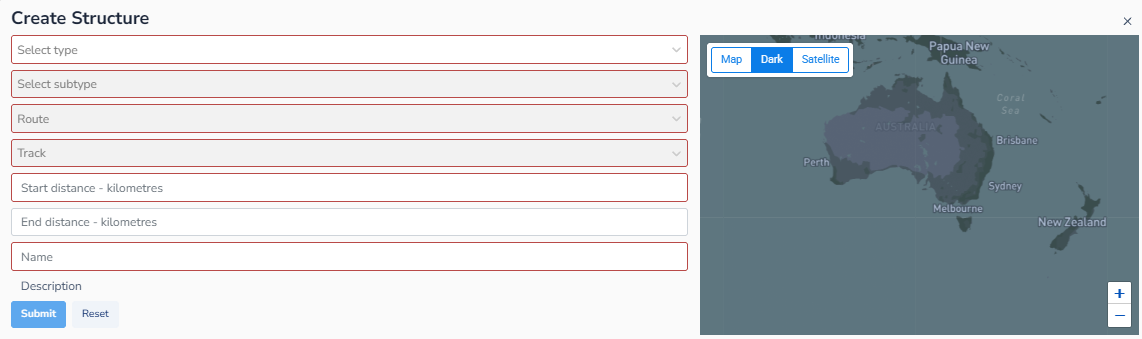
3. Complete the Create Structure form by filling in the required fields:
-
Type
Choose from the Structure Type dropdown (e.g. Platform, Bridge).
Note: The structure Type informs the options available in the Structure Subtype dropdown menu. -
Subtype
Choose the Structure Subtype (e.g. Platform Back, Awning). -
ELR/Route
The ELR/Route the structure is located on -
Track
The Track the structure is located on -
Start distance
The location of the start of the Structure -
End distance
The location of the end of the Structure -
Name
The name of the Structure
Note: The Name field will automatically populate with the Structure Subtype selected. Users can remove this or add to this.
4. Save and validate
Once all required fields are filled, click Submit.
The system will validate required fields.
If any errors appear:
-
Review the highlighted fields. Correct the values - then save again.
After saving successfully you will be redirected to the Structure Viewer page.
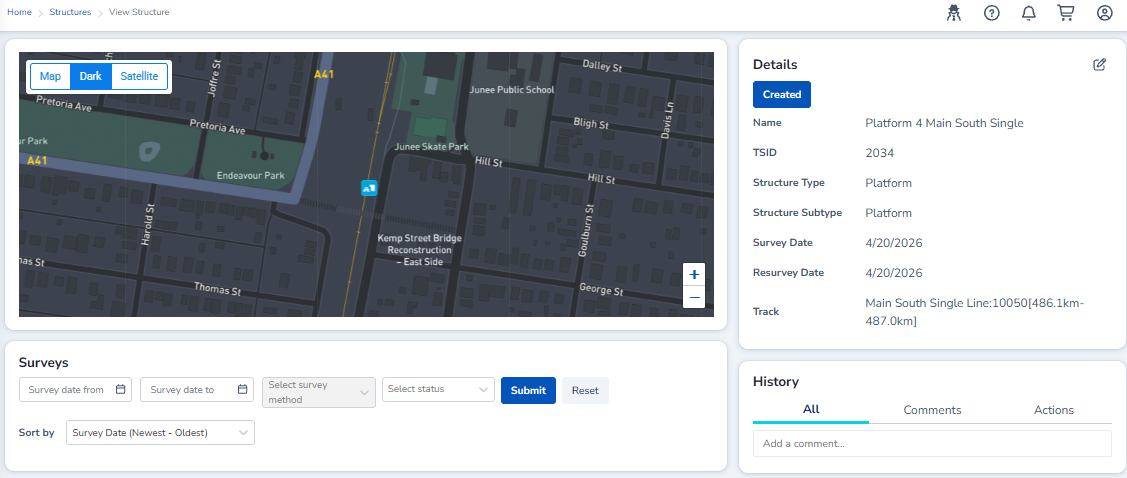
5. Verify the Structure
After creation, do a quality check:
-
Structure Viewer - Ensure the Structure information is correct.
-
Explorer - Open the Explorer map and search for the Structure using the Network, Location or Entity search. Confirm the Structure appears at the expected position.